A Tale of Two Leaks
Woe is me. My precious Lazy Daze is leaking again. Last fall I discovered two leaks in my 1992 Lazy Daze Mid Bath RV. I sealed this - I sealed that. The leaks, they go on leaking.
If I had known what a challenge finding the source (or sources) of these leaks was going to be I would have taken notes as I went along. Now I want to reconstruct the chronology of my efforts as best I can from memory (I started this page December 10, 2008) to see if I can shed some light on what could be leaking that has escaped my attention so far.
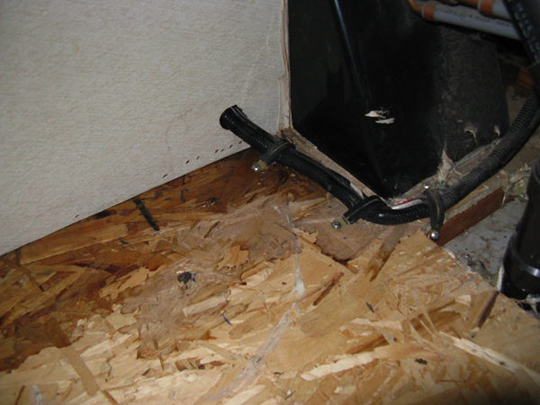
Water on the floor under the desk, Nov 15, 2008, Hazelton PA
Let's start with a chronology of my finding the leaks and trying to seal them
While the rig was parked by the house last summer and fall (from May 7th until November 14th, 2008) I did some work up on the roof.
Note: The rig sat all summer with its nose slightly low and tilted slightly to the right. This might be significant - water tends to run down hill.
I replaced swamp cooler in the hall with a Fantastic Fan. Following the instructions that came with the fan I screwed it to the roof using the supplied gasket and screws, and then ran a bead of PL Ultimate Hybrid Sealant + Adhesive caulk around the edges.
Then I saw a leak under the desk. During a moderately heavy rain I found water under the desk - down at the floor in the corner where the shower wall and the outside wall of the rig intersect. The water was running down along the electrical wires that exit the outer wall in that corner, onto the floor, then along the edge of the floor toward the rear. The picture above was taken later but it shows what I found that day.
Note: Noticing this leak reminded me of the puzzling corrosion of my cell phone charger connector. That connector usually lay in the jumble of chargers and wires on the floor back there under the desk. At this point I'm not sure whether I found the corroded connector before or after I did the roof work. I'm thinking now it got wet lying on the floor.
It couldn't possibly be a leak around the new fan. That installation went carefully and well and besides, wouldn't a leak there show up on the ceiling around the fan - not down at the floor by the wall?
So I cleaned and sealed all the questionable areas along the edge of the roof I could find with Eternabond tape. I worked along seam where the edge moulding meets the aluminum roof the left side of the rig roughly from the bathroom fan back all the way to the rear of the rig. I taped some areas on the right side as well. This seam had been sealed with Eternabond tape by a previous owner but there were areas I thought might be questionable due to poor workmanship.
Then I replaced the bathroom skylight with a new unit, screwing the new one down in a bed of PL Ultimate Hybrid Sealant + Adhesive caulk. The old one was cracked in several places and I thought it could be the source of the leak and replaced it.
That didn't work - it still leaks
November 15th, 2008, the second day of my winter jaunt south, was a rainy day. I drove in the rain most all day if memory serves. The leak leaked (see the picture above).
Then I found a new leak by the entry door, down at the floor by the furnace, just to add to my leaky tale of woe.
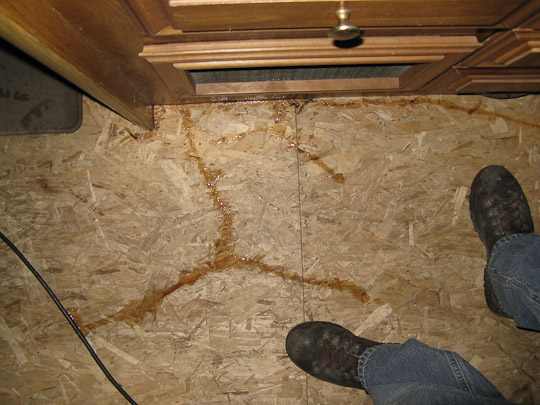
Water on the floor by the furnace, Nov 15, 2008, Hazelton PA
In the photo it looks like, from the direction of the water flowing on the floor, that the rig is sitting nose high and tilted left. I'm not sure if this is significant to what follows but I'll note it anyway.
From my Travels With LD entry Saturday, November 15, 2008 - Hazleton PA:
Am I ever glad I ripped out the old carpeting
I'm getting tired of living with the rough old OSB subfloor but not having a carpet has some real benefits. My next floor covering definitely won't be carpeting. As long as this old RV is going to keep humbling me I need to see the waters flowing.
More than once since I ripped that carpeting out I've discovered water on the floor. Water that would have flowed undetected under the carpeting, at least until growing stuff started to stink. Most recently was a month or so back when during a hard rain I found water flowing along the wall under my desk. A day spent on the roof resealing around the vents and along the edge trim fixed that. Or so I thought. But that's another story.
Today it rained off and increasingly on as I headed down through Pennsylvania on I-81. Mid afternoon I stopped at Lowes in Hazleton PA to do a bit of shopping and came back to the river you see above coming out from under the closet by the door. Hoo boy - looks like I'm back in the barrel for another leak sealing lap.
The next step was to seal the existing Fantastic Fans
While I was camped at Foscue Creek Park in Demopolis AL I took a whack at fixing the leak(s) on November 30th and December 3rd
I stripped the caulk around the two original Fantastic Fans in the bathroom and rear lounge, caulked along the edges with PL Ultimate Hybrid Sealant + Adhesive caulk, and then covered the edges with Eternabond tape.
Later it rained and there were a few drops of water at the wire exiting the wall under the desk. Nothing at the door.
Now it's December 10, 2008 - it rained hard last night.
The rig was parked with its nose slightly low and tilted slightly to the right.
We had some thunderstoems and heavy rain during the night. This morning the leak by the door showed some dampness. The area under the desk was dry. See?
Here the rig sits nearly level.
[Update Dec 10 mid morning] I moved the rig from the bath house, where it spent the night, back to Site 39 after the below pictures were taken - now there is MORE water on the floor by the door but still none under the desk. Did the driving tip some pooled water off the roof deck letting it run down inside the wall? Or was it just time passing that added to the puddle?
[Update Dec 10 11:19pm] It's been raining steadily all day. The leak by the door continues - it's still dry under the desk.
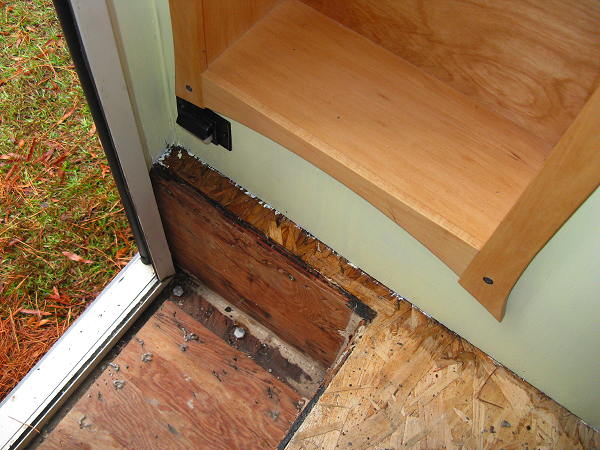
Water on the floor by the door, Dec 10, 2008, Twiltley Branch Campground, Collinsville MS
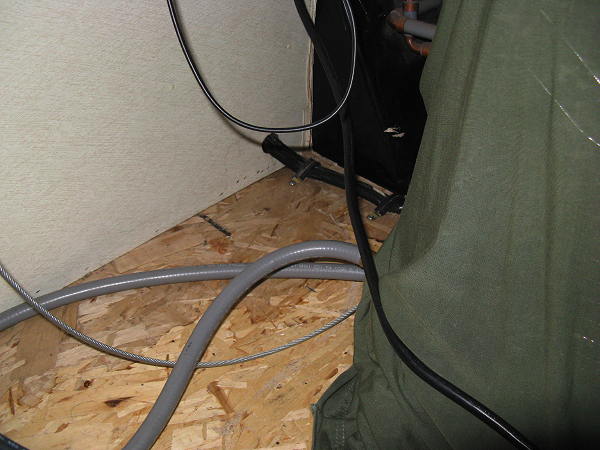
Dry on the floor under the desk, Dec 10, 2008, Twiltley Branch Campground, Collinsville MS
Now to figure out what to make of all this
The obvious place to look for a leak is at the new Fantastic Fan, at least for the first leak. After all it showed up not long after the fan was put in. And I did look there. The installation looked fine and logic told me if the gasket sealing the fan to the roof leaked the water would show up inside at the fan - not down on the floor under the desk. But it might not be quite so simple.
What if the seal of the new Fantastic Fan gasket to the roof leaked and water ran in under the gasket (that gasket made me uneasy from the day I installed it - but I followed Fantastic's directions anyway - after all Fantastic is a reputable company selling a quality product), over the lip of the aluminum roof and then instead of dripping down inside the rig it wicked under the roofing between the aluminum and the plywood roof decking. From there it could emerge anywhere around the perimeter of the rig it finds a path and some help from gravity. It's not very far from the fan to the edge of the roof above the desk on one side or to the edge of the roof aft of the entry door on the curb side.
If this theory holds water I might have one leak finding its way to two exit points, with water appearing at one or the other depending on which way the rig leans. The only time water showed up at both points at the same time was on the day I was traveling in the rain. Otherwise it has been one or the other - not both. Surely that's not coincidence but I can't figure out what the variable is from the data at hand.
Do I have one leak or two? Maybe. In any case my next step is to seal the new Fantastic Fan with Eternabond tape. But that will have to wait for the roof to dry off after it stops raining.
Friday it was finally dry enough to work on the roof
What I found when I took the MaxxAir Fan/Mate hood and its mounting hardware off the new Fantastic Fan so I could inspect my installation was rather disconcerting. I think found the leak, maybe even both of them. I certainly found a defect in my workmanship. Sheesh .... look at that!
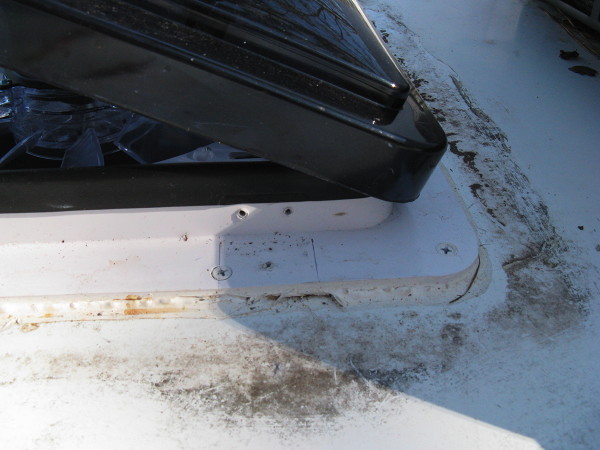
Questionable seal at the new vent, Dec 12, 2008, Twiltley Branch Campground, Collinsville MS
That gap in the caulk alone shouldn't cause the leak - there's a new foam gasket between the vent and the roof - but I'll bet it did.
That gap is almost directly opposite the leak by the door (behind the photographer). If that gap leaks I'd say there's a good possibility of water finding it's way across the roof and down the wall on that side. For it to go diagonally across the vent opening and eventually over to the floor aft of the shower seems like a stretch. But maybe it can. We'll watch and see.
It won't leak now - I ran Eternabond tape all the way around the perimeter - that stuff is tenacious and that's that!
Cross my fingers.
Oh foo.... to quote myself
Oh, yes, before I forget - it rained lightly this afternoon - and the leak by the door leaked lightly as well - oh foo.........
On Monday, December 29, 2008 I removed and resealed the roof air conditioner
I've been saving the job of checking the air conditioner until last. I was afraid it might be a big project - I have no experience with roof air conditioners and was a little concerned about getting in over my head. And besides, the AC had been replaced not long before I bought the rig - it must be ok. But every other penetration of the roof has been checked and the leak persists.
I can't be sure I've found the culprit but there were a couple of clues and questionable spots.
After I removed the interior trim and AC mechanism and the pinch bolts that clamp the air conditioner to the roof I started probing around the opening breaking the seal of the gasket to the roof and near the left front when I pried the AC up and stuck my fingers in the gap they came out wet. Inconclusive Clue #1 - I couldn't find any dampness or water stains indicating the water was getting in between the aluminum roof covering and the plywood deck.
Then after I had the AC loosened up and removed it from the opening I found that the earlier removal of the AC unit for replacement had ended with torn aluminum at the corners which was patched with Eternabond tape. That's ok, but the tape wasn't completely adhered in some spots, especially at the left front and right rear corners of the opening. Inconclusive Clue #2.
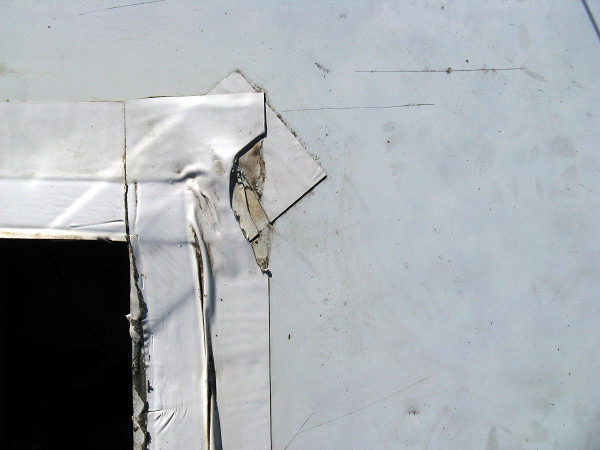
Questionable seal at the left front of the air conditioner opening, Marathon Motel & RV Park, Marathon TX, December 29, 2008
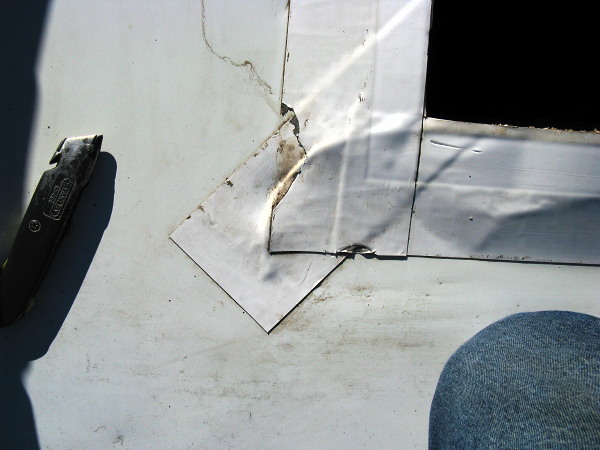
Questionable seal at the right rear of the air conditioner opening, Marathon Motel & RV Park, Marathon TX, December 29, 2008
I removed most of the poorly adhered Eternabond tape and covered the questionable areas with new tape. Then I reset the AC and bedded the gasket in a bead of PL Ultimate Hybrid Sealant + Adhesive caulk. This caulk will probably cause problems removing the unit next time but I had damaged the gasket slightly along the front edge and in my frustration with sealing this leak I want to be extra sure I have a good seal of the AC to the roof.
Cross my fingers again. The only thing left that could possibly be leaking is the awning and I don't look forward to removing that.
It hasn't rained on the rig in two weeks now and the door finally latches and locks without resistance for the first time in months. The wet wall must be dry at last and I hope it stays that way.
It didn't - the leaks are as active as ever
It is now early in May, 2009 and I'm on my way east from a winter spent in the dry southwest. This has been a wet ride the last couple of days and is the first time the rig has been rained on enough to test the sealing work done last December. It would seem that work was misdirected (other than learning where the leaks are NOT sourced).
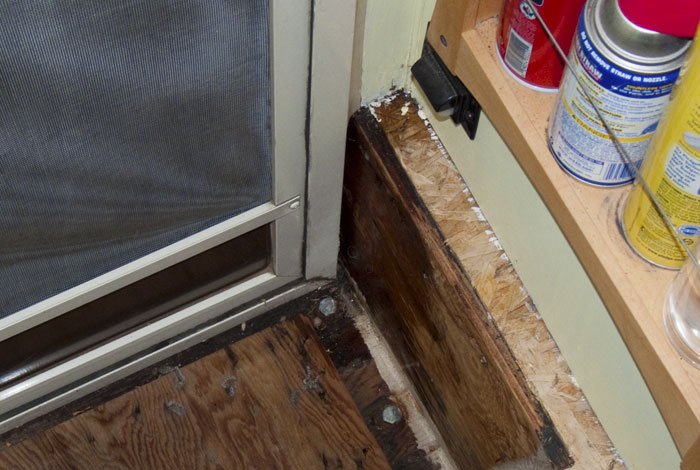
Leak by door after all night drizzle at Wal-mart, Neosho MO, May 3, 2009
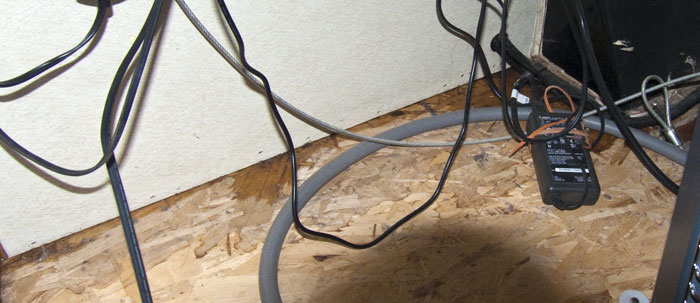
Leak under desk after an all night drizzle at Wal-mart, Neosho MO, May 3, 2009
The rig spent the night slightly nose down and to the left
Yesterday, Saturday, May 2, 2009 - Neosho MO, while driving in some rain the leak under the desk showed up but not the one by the door, leading me to think the sealing of the A/C had fixed that one. But apparently that's not the case.
A couple of observations during a light rain Saturday, May 2, 2009 - Neosho MO
Re: the leak by the door
There are a couple of small rivulets running down the sidewall, aft of the awning, onto the top edge of the window trim and NO corresponding rivulet exiting the bottom of the window trim. And there is no other water on that sidewall closer to the door - that area is shielded from the rainfall by the awning. Thus it would appear the window is leaking but not the door.
Re: the leak under the desk
There seems to be more water running down onto the top of the window trim than is exiting at the bottom but there is generally more water hitting the left side of the rig than the right side and a conclusion that water is seeping in around the window is less clear on this side.
On Saturday, May 16, 2009 I caulked around the right side aft window
Rain was expected later in the day and I wanted to get this caulking done before it rained, on the presumption that it was the window leaking. This conclusion was reinforced by a little garden hose test a week or so back where I sprayed an intense stream onto the wall above the window with a concentration at the top right corner. After many minutes of spraying the floor by the door was beginning to show a slight dampness and I concluded the window was leaking. Doing a similar spray test on the left aft window produced no dampness under the desk.
I guess I was wrong about the right aft window leaking. The morning after the rain I awoke to evidence of the same old major water leaks both at the door and under the desk. I expected to find water under the desk since I had not done any sealing on that side but by the door.... well gees.
It's now Monday, June 8, 2009 and, dare I say it again? I think I found the leaks
A couple of weeks ago I parked facing uphill (to sort of simulate driving in the rain) and started spraying water along the driver's side wall, gradually working my way up the side. After spending some time with the hose focussed on the area around the water inlets and power plugs I ended up with a very light dampness under the desk. But a visual inspection didn't show anything obvious amiss with any of those penetrations and besides all that work was newly done over when I had the side apart dealing with the Major Water Leak Repair. Surely there couldn't be anything wrong with my fine workmanship.
On the off chance it is my fine workmanship I decided to reseal the fresh water inlet hatch
After thinking about it for a while I decided that maybe water could be getting into one of the lapped siding seams and running along the seam to emerge onto the plywood siding liner behind the fresh water inlet hatch - then running from there along behind the siding to finally emerge under the desk. It seemed a bit far fetched but on a hunch I took the fitting off and found a discolored area of the sealant and a bit of dampness on the plywood. Alas I didn't take any pictures - shame on me. Last week I carefully resealed the water inlet hatch and today I repeated the water spray test. All is dry - no leak from the test knock on wood.
Then I turned the rig around and started spraying on the right side looking for that big leak by the door.
Last week I had checked carefully around the awning for leaks and was pretty sure the awning was ok. I had taken all the screws out that hold the awning assembly tight to the wall (but not the screws above the assembly that attach the hanger rail to the wall - those look ok from a careful inspection from above) and could see no rust on the screws - I don't think water has ever gotten in up there. This posed a dilemma because my close visual inspection of the wall below the awning didn't turn up anything suspicious and there isn't much left to investigate.
The only thing I could think of was that possibly a rivet holding the fender skirt hinge to the wheel well was loose but they all seemed tight. But anyway that's where I started my spray test. Nothing. Then I moved up to the furnace vent. Nothing. Then the water heater hatch. Nothing. Time for a break..... Coming back from the break I find a little dampness by the door. Aha! So I start in again along the hinge. Now we're getting a little trickle coming in. So I lift LD's fender skirt (blush) and after wiping the mud away I see a crack in the caulk along the edge of the metal wheel well liner. I had missed this crack the last time I looked in this area many months ago. Well gee wiz guys! This is the same phenomenon that caused the big leak I had to tear the rig apart to fix. Caulking the butt edge of a metal edge and expecting it not to ever leak! Sheesh! Come on! These dissimilar materials move relative to each other and the butt edge of a sheet of metal gives a very small contact area to seal.
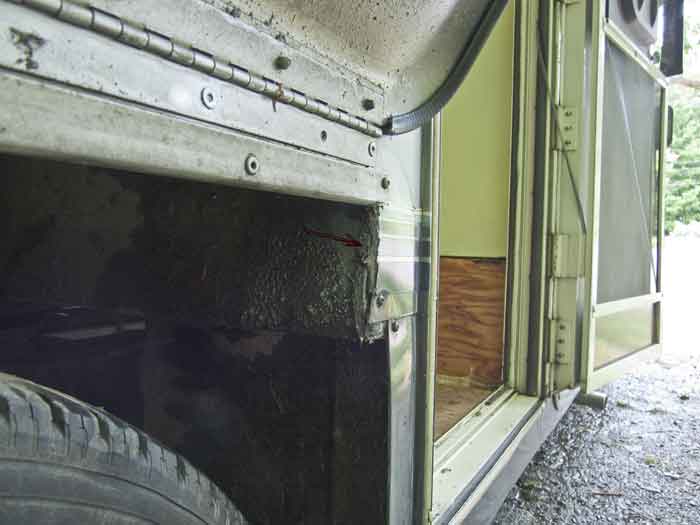
Break in seal at forward edge of right wheelwell, June 8, 2009
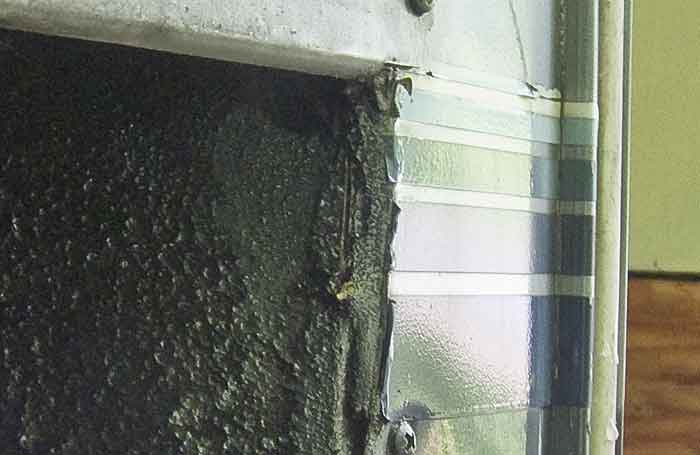
Detail at break in seal at forward edge of right wheelwell, June 8, 2009
See that crack? To the left is an undercoated sheetmetal liner over plywood. To the right is the butt end of the plywood sheathing behind the aluminum skin. Those two surfaces just have to move relative to one another and a little caulk smeared along there just won't hold up. My plan is to clean up this area and put an Eternabond patch over it. Maybe I'll go check the other wheel well...
My plan is to cover this area with Eternabond tape but alas I've used up a whole 4 x 50 roll already. As a temporary repair I put some caulk in the crack until I can get a roll of tape.
Holy moly look at that river!
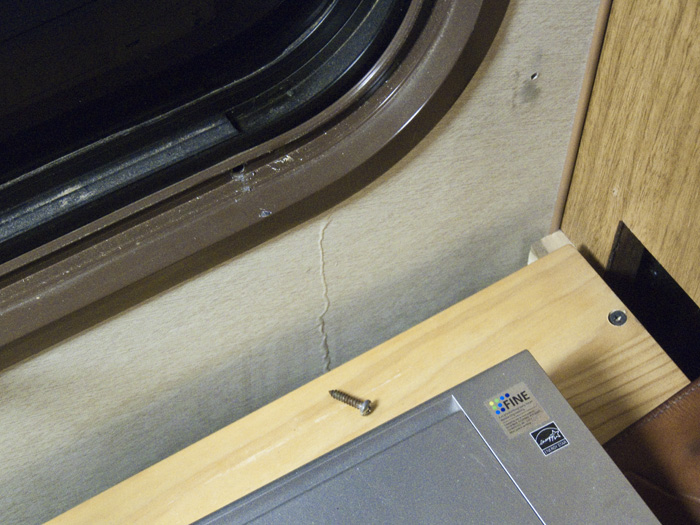
Leak at left rear window, June 12, 2009
For now I'm going to try and outline what followed this event and come back and edit later.
The leak above showed up during a downpour the night of June 12. The first thing I did after shining a flashlight under the desk to see if my resealing of the water fill hatch fixed the leak and found that indeed it had not was to start tearing the panelling off the wall to get a better sense of where the water was coming from. It seemed to be coming down the wall and studs from the front edge of the window above. When I decided to remove the window trim to have a look I saw the river in the picture above.
Removing the window trim showed water coming in at the point where the siding seam meets the window frame near the top of the window then running down the edge of the stud. This is a leak similar to the one I found at the water inlet hatch.
The next day, after it had dried out, I recaulked the window perimeter (I had caulked it last fall) paying careful attention to getting the siding seam sealed. Testing seemed to indicate this worked and fixed the problem. Not so. A downpour a few days later resulted in roughly as much water coming in. I immediately took the window trim off again and all was dry at the upper seam. I couldn't see the end of the lower seam. Testing later with a hose directed right at the lower seam revealed it was leaking. Not wanting to take that big window completely out I decided to run a bead of caulk the full length of that seam. A third downpour a couple of days later resulted in NO leak. By George I think I've got it!
Tags: RV Information