Major Water Leak Repair
When I first looked at the Lazy Daze in Memphis I noted blistered paint around the refrigerator service vent. This is generally recognized as a sign of water behind the aluminum skin etching its way through the skin over time and pushing the paint off.
Blistering paint is a known symptom in the Lazy Daze community as an indicator of serious wetness behind the aluminum skin, a sign of a leak serious enough for the moisture to etch its way through the aluminum skin and push the paint off. This much water can result in structural damage to the wood framing and be expensive to repair. Somehow I had to find out if this leak had been repaired. The sellers had only owned the rig a couple of years and didn't know anything about it. My search through the incomplete maintenance records they had available didn't turn up any mention of the leak.
Just by luck there were a few paper grocery bags lying on the floor of the cabinet under the refrigerator and again just by luck, folded such that the bottom edge of the bag was wedged down between the outside wall and the edge of the carpet. The bag edge was damp. Darn. That question is answered - the leak hasn't been fixed.
I used the blistering as a bargaining chip and got a bit of a break on the price when I negotiated for the rig. If I had known then what I know now I might have bargained a bit harder.
Let's start with some pictures
Unfortunately I didn't start taking pictures until after I got the rig home and started taking things apart to diagnose and fix the leak. Now I wish I had.
Below is a picture of the front left corner of the coach with the refrigerator service vent already removed.
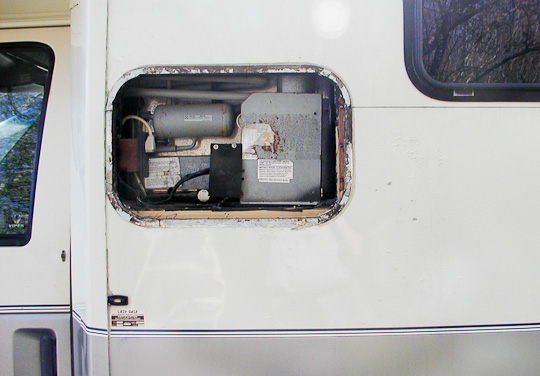
Area of paint blistering
Next is a closeup which clearly shows the paint blisters below and to the right of the vent.
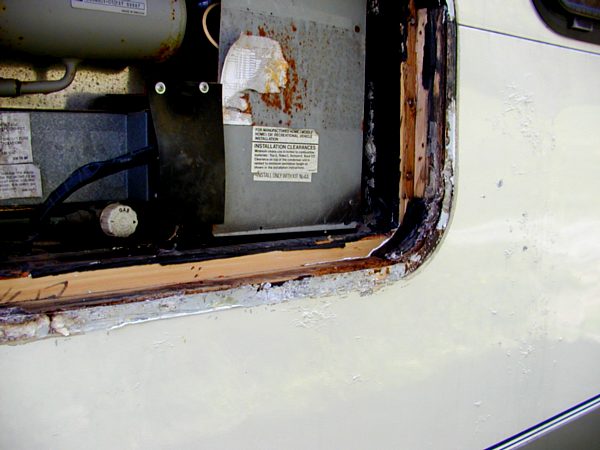
Close-up of paint blistering below and to right of vent
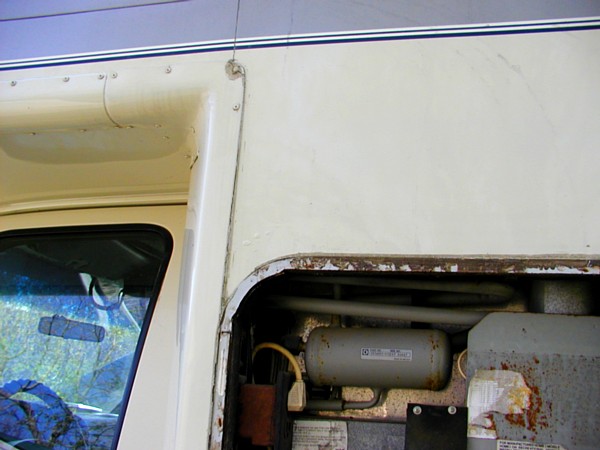
Close-up of paint blistering above vent
Here is a picture taken looking into the cabinet under the refrigerator that shows a section of rotten floor and wall. I've removed the plywood interior wall which was completely delaminated and barely held together by its vinyl skin. The wet paper bags were up against the outside wall and tucked behind the old carpet on the floor of the cabinet.
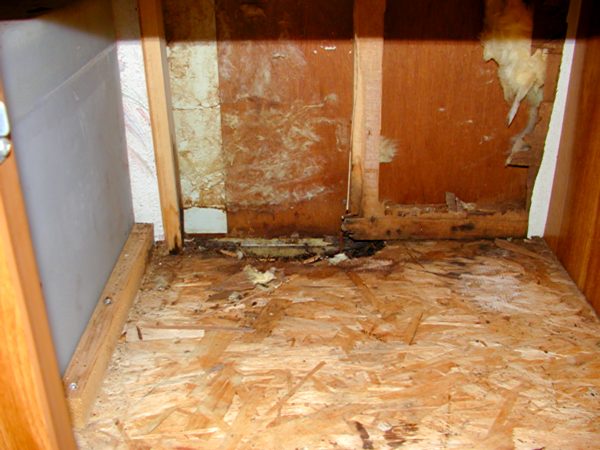
Interior floor and wall rot under fridge
And another under cabinet picture.
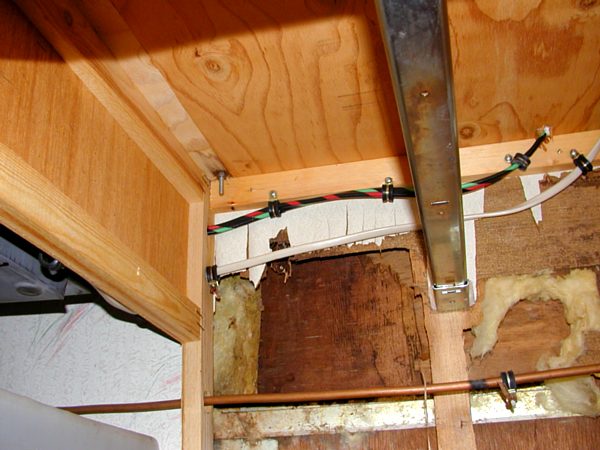
Interior wall rot under fridge
And now the kicker.
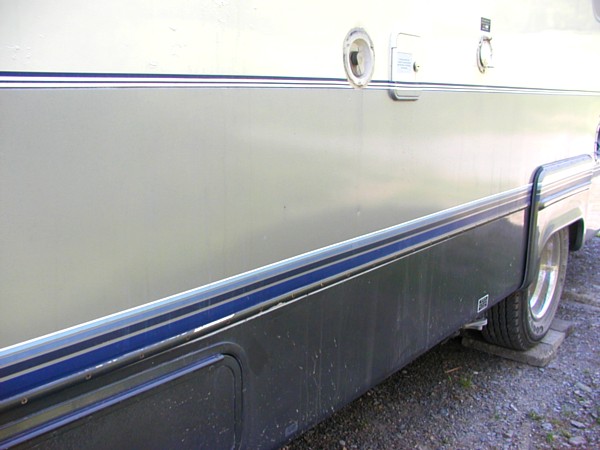
Water tank sag
Water tank sag
5/8/07 I noticed late in the day that the fiberglass skirt panel below the trim strip is sagging from the weight of the full fresh water tank (I filled it yesterday for the first time). The point of maximum sag is roughly below the aft edge of the refrigerator and forward edge of the water tank and is down about 1/4 inch. You can see the sag as a tapering white line just under the screwed on trim strip in the above photograph. I would assume the sag in the skirt is reflecting a similar sag in the floor the water tank rests on.
Removing the lower fiberglass skirt
5/12/07 Today I removed the drivers side fiberglass skirt below the refrigerator service vent as a first step toward evaluating and rebuilding the rotted wall and floor structure below the refrigerator. To remove the skirt I did the following.
Remove the waist trim strip
There is an extruded aluminum trim strip along the joint between the fiberglass skirt and the lower aluminum siding piece. This is screwed on and easily removed.
Remove the corner cap
The plastic corner cap must come off before the fiberglass skirt can come off. This cap covers the ends of the side skins and lower skirts where they butt at the corners of the house and waterproofs the corner. The cap took quite a bit of patience to get off without unduly damaging it or the paint in the process. The cap is held on with screws at the top and bottom and is adhered to the skins with a polybutylene tape whose bond must be broken to free it from the corner. First, to keep from tearing the paint film, I ran a utility knife all along the edges to slit the film. Then I softened the polybutylene tape by heating an area with a blow dryer and then by carefully pushing a thin beekeepers bar into the heated area I opened the joint and pushed the tape back into the corner. As I worked along I held the joint open with wooden wedges that I advanced behind me as I went along. This took quite a while, heating and working a short section at a time. Later I learned when removing the skirt that by prying the joint open and stretching the sealant one can easily slit the stretched sealant strands with a knife. This technique might have worked on the tape as well and saved some time.
Remove the storage hatch door frame
First I took the door off by removing a screw from the end of the hinge and sliding the rubber hinge keeper out of the extrusion and then sliding the door off the extrusion. The hatch frame is held on by a strip of polybutylene tape around its perimeter and by clips screwed into the wooden hatch framing. I removed the screws from the clips and then, since sealant tape wasn't adhered very well I carefully pried the frame off, working my way around the perimeter in stages.
Remove the fiberglas skirt
The skirt is a real pain to remove. It is well bedded in surprisingly elastic and tenacious polyureathane sealant whose bond must be broken around the perimeter of the hatch and along the front and rear edges of the fiberglass. After I had all the screws and staples out of the fiberglass I found I could pry the fiberglass away from the wood or metal and slit the stretched sealant strands with a long butcher knife. This worked quite well.
Assess the damage
Now that I have the lower skirt off and the first strip of aluminum skin loose as far back as the wheelwell I can peak up under the skirt and see that the 2x2 running along the perimeter of the floor sandwich is rotted all the way back to the wheelwell as is the 2x2 plate the studs sit on. And of course the OSB (Oriented Strand Board) sandwiched between them is rotten too. It's all too onvious I'm going to have to bite the bullet and remove at least the bottom strip of aluminum skin. Darn.
Remove the bottom skin strip
To remove the bottom skin strip Lazy Daze fancy fender skirt must come off. As must the lower rear corner molding. The fender skirt is attached by a piano hinge riveted along its top edge to the aluminum strip. Drilling the rivets out and cutting the polyureathane caulk behind it takes that off. The rear corner moulding is a repeat of the front corner and comes off much quicker now that I have experience with the front molding. The top edge of the aluminum skin strip slips into a groove behind the strip above and is attached with a few screws along its bottom edge to the lower skirt. Taking those few screws out lets it come free. Care is needed here as this thing is about twenty feet long and quite flexible. Letting this thing get free and kinked would be a major disaster. I managed to get it free safely - we'll see how successful the installation goes later.
Tags: RV Information