PT-1845 Shuttle Ball Repair
Let me describe this repair by quoting a TractorByNet Power-Trac forum thread I initiated on the subject.
I write
I've been putting up with a slow hydraulic fluid leak for months now. Every now & then I would take a look around, decide it was a fitting on one of the many return lines to the tank and put off doing anything about it. They are really tough to reach and if I have to take one off, the tank has to be drained first. Procrastination rules!
Until yesterday when out mowing and the leak got suddenly much worse. As my eye passed by the RPS valve on its way to visually check out the return hoses it was arrested by a fitting that looked bent. Bent? Gwan, how can that be? Well, it was bent alright. And leaking like a sieve.
When I took the hose off and the fitting out what I found was quite astonishing.
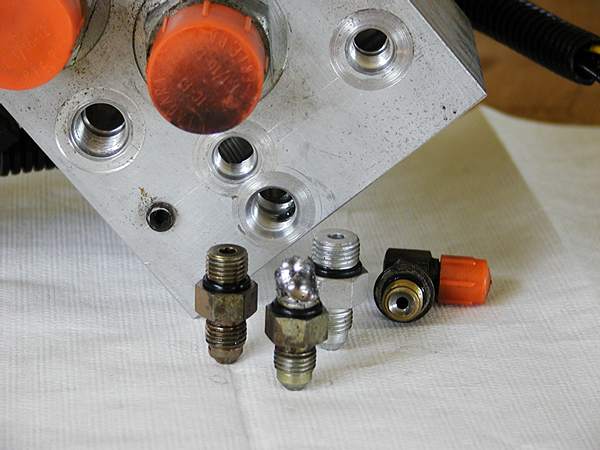
In the picture you'll see four fittings, which we'll call 1 2 3 4 left to right. Number 1 came out of the hole directly above it. Number 2 came out of the adjacent hole (yes, the hole looks larger - I machined it to accept a larger replacement fitting (number 3). Number 4 came out of the other end of the same hole as number 2. A close examination will show some damage to the number 2 fitting - for comparison it started life identical to number 1. Also note the shape and color of the tip of number 4.
Here's what happened. The "machinist" put number 4 in its already drilled and tapped hole and ran a ball end mill (an especially long one - that aluminum block is 3 inches thick) into the hole from the number 2 end and machined a nice concavity in it's end. Then (s)he took it back out, put number 2 into it's already drilled & tapped hole and ran the ball end mill through from the number 4 side ALL THE WAY TO THE O-RING!
Why!? Beats me.
Why did the thing hold up for 400 hours? Beats me.
I hereby donate twenty lashes with a wet hose to that darn fool "machinist"
Sedgewood
MossRoad responds
Yikey yikes!
MossRoad
Blackwell responds
That is a fitting in the high pressure oil shuttle. The damage is caused by the ball shuttling back and forth each time you shift from forward to reverse pounding the end of the fitting into that shape. It was not machined that way, in a shuttle valve the ball is seated into the softer fitting by setting the ball on the end of the fitting and striking lightly with a hammer. Sometimes shuttle valves will hammer into destortions as seen in your photo. Just reseat another fitting and install into the valve, don't forget to insert the ball in the valve between the fittings or your machine will not tram very well and no pressure will be available to release the brakes or operate the draft. These high pressure shuttles are designed to be repaired by replacing the inexpensive fitting instead of the entire valve. EB
Rip responds
Ed,
Thanks for clearing that up.... I learn somethng every (or almost) day around this forum. Today for sure!!
Rip
cjturner responds
Will it cause problems that the fitting has been replaced by a larger fitting?
He said he machined it out to accept a larger fitting.
My logic says that the only important part of the fitting is the ID (Inside Diameter) because that is where the pressure is generated/carried.
But that comes from very little Hydraulic knowledge.
Jeff Undecided...Researching
I respond
Blackwell, you're a life saver!
That is a fitting in the high pressure oil shuttle. The damage is caused by the ball shuttling back and forth each time you shift from forward to reverse pounding the end of the fitting into that shape. It was not machined that way, in a shuttle valve the ball is seated into the softer fitting by setting the ball on the end of the fitting and striking lightly with a hammer.
Yikes indeed! I hardly know where to start. First off the ball must have escaped while I was removing the RPS valve - I never knew there was one! And of course that much better explains what I was seeing, even the enlargement of the hole for the first inch in. It looks like someone had stared boring crooked.
Blackwell: Just reseat another fitting and install into the valve, don't forget to insert the ball in the valve between the fitting
Ok.
cjturner: Will it cause problems that the fitting has been replaced by a larger fitting? He said he machined it out to accept a larger fitting. My logic says that the only important part of the fitting is the ID (Inside Diameter) because that is where the pressure is generated/carried.
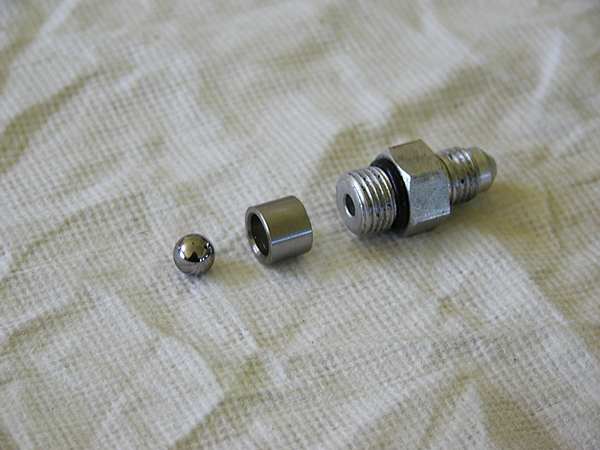
My logic says, especially because of the "crooked hole" wear (which I didn't mention until now) that the ball needs a guide to keep that pounding from continuing. To be sure I had plenty of clearance for the tap taper, I had drilled the hole about 3/8 of an inch deeper than the fitting needed. That gave me a nice clean hole to bush back to somewhere near the original diameter. (see attachment).
Blackwell: don't forget to insert the ball in the valve between the fittings or your machine will not tram very well and no pressure will be available to release the brakes or operate the draft.
Yikes! You mean I've been spending all this time since the fire living with a tram pedal that acts like it has a sticking cable and a draft control that only works intermittently and all it is is a sticky ball? At least that's my guess - that the ball in the process of beating up the fitting would occasionally get hung up then snap loose giving me sudden acceleration just like a sticky cable would. And that occasionally the ball would stay hung up causing the draft to stop working (trust me - you DO want that draft control working on a steep hillside!) The "sticky cable" I assumed was from the heat of the fire driving off the lubricant and that eventually I would have to remove it and either lube it or replace it. Procrastination rules again! The intermittent draft control I just couldn't figure out.
So, the new fitting is in, the ball is in, and I have a tractor that behaves like it should for the first time since before the fire! No hydraulic leak, no sticky tram, no intermittent draft. Wow - life is GOOD!
Blackwell: These high pressure shuttles are designed to be repaired by replacing the inexpensive fitting instead of the entire valve.
In theory I like that concept but in practice it hasn't worked out so well since I didn't know I had to keep my eye on the ball. How common is this failure? Does one need to add "check your balls" to the regular maintenance schedule? Letting it beat itself up to this extent can easily lead to a blown off hose (what a mess!) and/or a destroyed RPS valve body ($$!) Does one need to pedal slowly to reduce "slamming" the ball from fitting to fitting? What a drag that would be! Tramming fore & aft has a natural rhythm that I'd sorely miss if I had to give it up. I do a lot of mowing around trees and bushes and along field edges where I'm constantly nosing the mower in under the trees and bushes as I work my way around them ie. I tram fore and aft A LOT! Maybe I'll keep some balls and fittings on hand.
Thanks Blackwell, I'm grateful for your experienced input. This forum is a resource I wouldn't want to live without as a Power-Trac (discovered here!) owner.
Now about those 20 lashes...
Sedgewood
Purpose of shuttle valve and how it works
Hydraulic fluid is supplied from the tram pump to operate the brake tender and draft control. As you tram back and forth the tram pump supplies a flow of oil to the shuttle valve (in the RPS valve) alternately from the left and right side of the pump. The shuttle valve ball slams back and forth between the fittings connecting the tram pump lines to the shuttle valve acting as a check valve in whichever line is not pressurized at the moment. Ports located between the inlet lines thus supply a constant flow of fluid to the brake tender and draft control circuits.